some copy paste from other Cooking Blog...this is just for my collection and not for other...sorry if any breaking copyright or so..does not meant to do so... this is for me so when I have time I can see and make and don't have to search .....
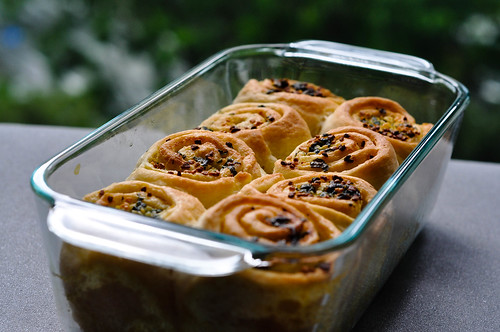
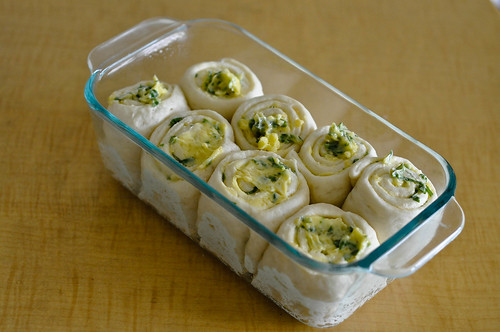
I halved the recipe and got 8 mini rolls, enough to serve 2 very generously. We had one here and one there, through the weekend.
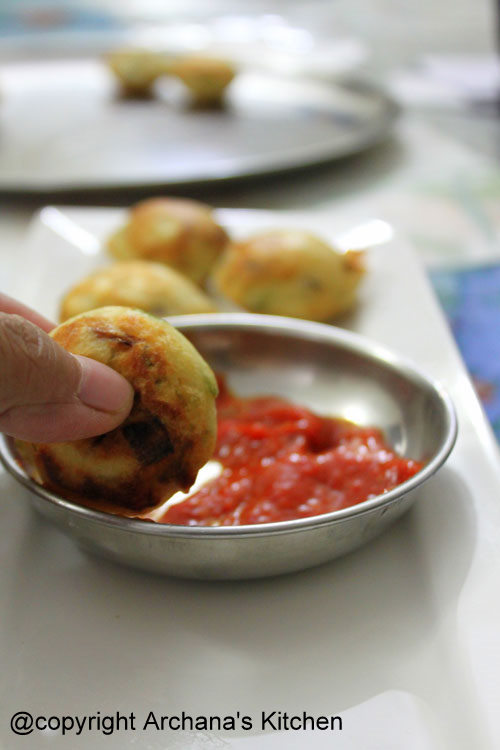
Garlic Pull-Apart Rolls
Recipe source: Suhaina
Makes 8 mini rolls
Ingredients:
Plain Flour - 1.5 cups
Warm Water- 1/2 cup + 1 tbsp
Yeast - 1/2 tbsp
Salt - 1tsp
Sugar - 1 tbsp
Olive Oil - 1 tbsp + 1 tsp
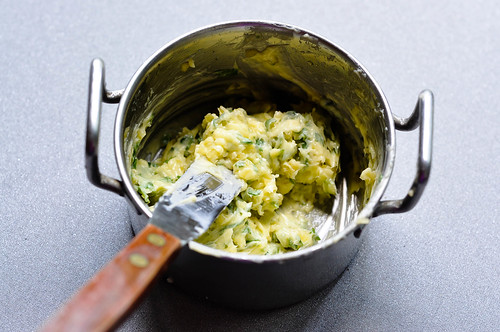
For Garlic Spread:
Salted butter, at room temperature - 6 tbsp
Minced garlic - 2 tbsp
Chopped coriander leaves - 2 tbsp
How I Made It:
1. Mix flour, yeast, warm water, salt and sugar together until you get a smooth, slightly stick dough.
2. Add oil to your fingertips and knead until the dough springs back when you press with your fingers - about 4-5 mins.
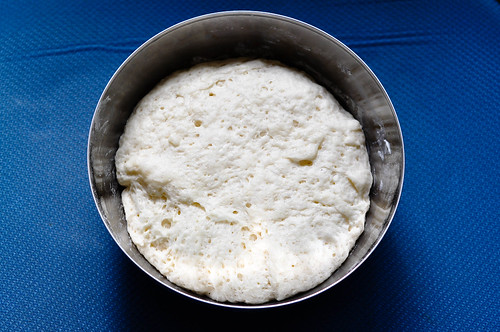
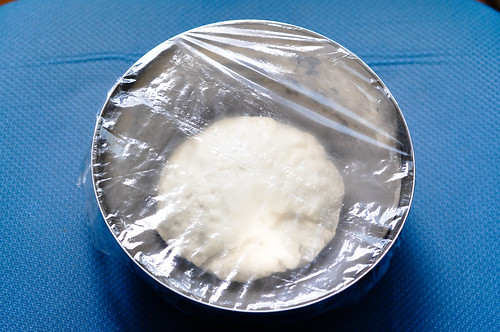
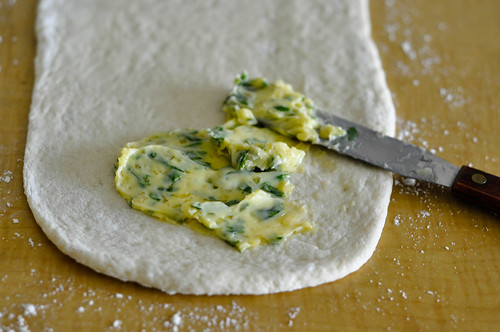
3. Wrap in cling film and allow to double by keeping in a warm place for about 45 mins. Meanwhile, make the garlic spread by simpy mixing all the ingredients.
4. Grease a baking pan or loaf tin with olive oil. I used my Pyrex loaf pan which was the perfect size for 8 mini garlic rolls.
5. Knock down the air in the dough and divide the dough into two equal portions.
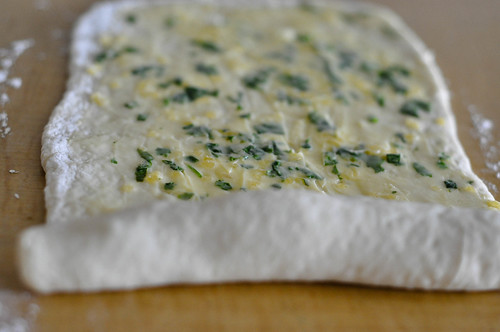
6. Transfer one portion of the dough to a floured surface and roll gently into a rough rectangle of 1/2" thickness. Apply more flour sparingly if sticky.
7. Spread about 2 tbsp of garlic spread on one side.
8. Roll from one end gently and firmly.
9. Cut into half and then each half again into two halves to get 4 equal portions.
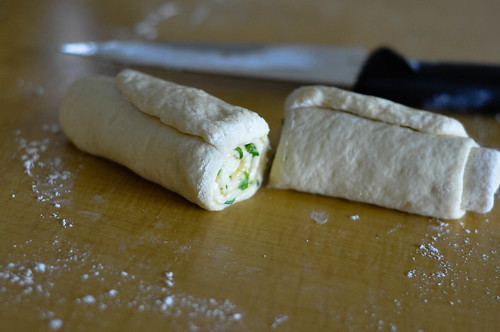
10. Now place the rolls with the cut side up in the greased pan.
Repeat the same procedure for the remaining dough.
11. Spread a little milk on the rolls and add the remaining garlic spread on top. I am sure sesame seeds as Suhaina has added will make the flavour even better but I didn't have any.
12. Allow to rise for another 20 minutes. In the mean time preheat the oven to 180C / 375F.
13. Bake for about 30 mins until the top is golden brown. My Pyrex glass pan usually takes longer to bake in, so mine took about 35 mins to bake just right.
These are really really soft and have an amazing flavour. Serve fresh and hot!
Cauliflower/Gobi Manchurian/ Chilly Gobi

Gobi Manjurian is a
wonderful dish to go along with any type of roti, appom or fried rice. It can be
made in dry form as a starter, or in a gravy or semi gravy form like I have did
here. Which ever form it takes, it is a yummy dish and even kids would love
it.
- Cauliflower-2.5 cups (cut into small florets)
- Soy sauce- ½ tsp
- Pepper pwd- ½ tsp
- Chilly pwd- ½ tsp
- Salt- ¼ tsp
- Plain Flour- 2 tbsp
- Corn Flour- 2tbps
- Oil for frying- 1/3 cup

Method:
Ingredients for the gravy:
 Sauces Mix together and keep
ready:
Sauces Mix together and keep
ready:
- Marinate the items except oil and keep aside for 10 minutes.
- Shallow fry the pcs in two or three batches and keep aside.
Ingredients for the gravy:
- Onion- 2 medium cubed
- Celery - 2 tbsp chopped
- Capsicum- 1 cubed( you can used ½ of red and ½ green to make it colourful)
- Green chilly- 2
- Garlic- 2 grated
- Ginger – 1 inch grated
- Corn Flour- 1 tbps heaped
- Salt- to taste.

- Soya sauce- 2tsp
- Chilly sauce- 1 tbps
- Tomato sauce- 1 tbps
- Vinegar- 1 tbps
- Chilly pwd- ½- 1 tsp( optional)
- Use the remaining oil that is left in the pan from frying the cauliflower.
- Add in the grated garlic and ginger and fry till fragrant.
- Add in the chopped celery and fry for one minute.
- Add in the chopped onions, chilly and capsicum and sauté for two minutes.
- Add in the sauce mix and stir well. Add salt to taste.
- Mix ½ cup water with the corn flour and make a smooth paste and pour into the pan and thicken the gravy.
- Stir well and add in the fried cauliflower pcs and cook covered for two minutes.
- Sprinkle some spring onion and serve immediately.

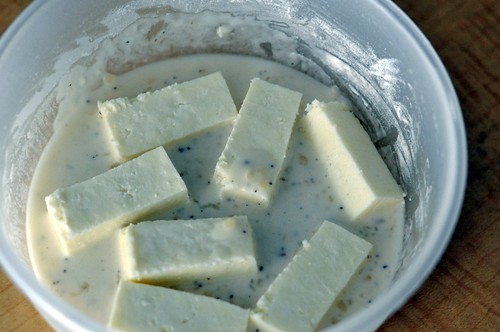
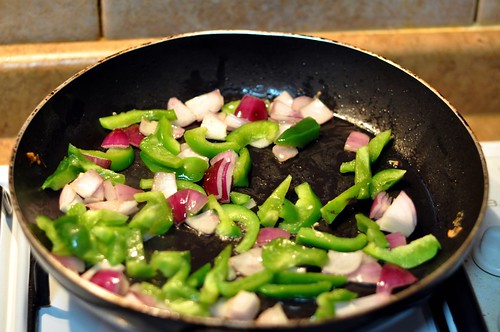
Chilli Paneer Recipe
Serves 2
Ingredients:
2 cups cubed paneer (I used longer slices)
1 bell pepper / capsicum
2 large onions
4 green chillies, slit
1 tsp ginger garlic paste (use freshly ground paste if possible)
1 tbsp soya sauce
1 tsp green chilli sauce
Cabbage
Onion Vada
This recipe is made from soaked and ground urad dal, flavored with chopped cabbage, green chillies and onions and steamed with a little oil in the Kuzhi paniyaram Pan . These vadas are exceptionaly tasty and healthy as well. Eliminates the hassels of getting the right shape as well. The vada tastes great in itself without the need for any accompaniments.


Makes: 20 vada’s
Ingredients
Serves 2
Ingredients:
2 cups cubed paneer (I used longer slices)
1 bell pepper / capsicum
2 large onions
4 green chillies, slit
1 tsp ginger garlic paste (use freshly ground paste if possible)
1 tbsp soya sauce
1 tsp green chilli sauce
1
tsp tomato paste / ketchup
2 tbsp + 1 tbsp oil
1/2 tsp sugar
2 tbsp + 1 tbsp oil
1/2 tsp sugar
1
tbsp cornflour + 3tbsp water (make a smooth paste)
Salt to taste
For the Marinade:
3 tbsp flour
2 tbsp corn flour / corn starch
1 tsp freshly ground pepper
1 tsp minced garlic
A pinch of salt
Water
How I Made It:
Salt to taste
For the Marinade:
3 tbsp flour
2 tbsp corn flour / corn starch
1 tsp freshly ground pepper
1 tsp minced garlic
A pinch of salt
Water
How I Made It:
1.
Make a thick-ish paste with the ingredients for marinade. Dunk the paneer pieces
in and let them soak in the marinade. It will be instant love, I promise.
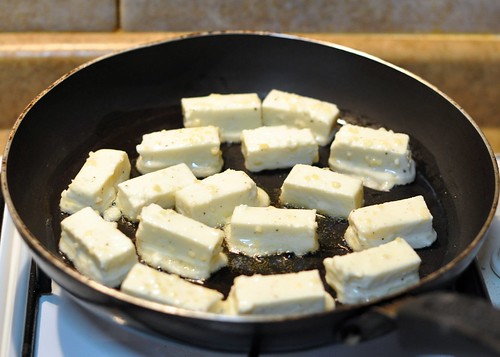
2.
Add 3-4 tbsp oil in a pan and shallow fry the paneer pieces, turning them over
when the cooked sides are brown.
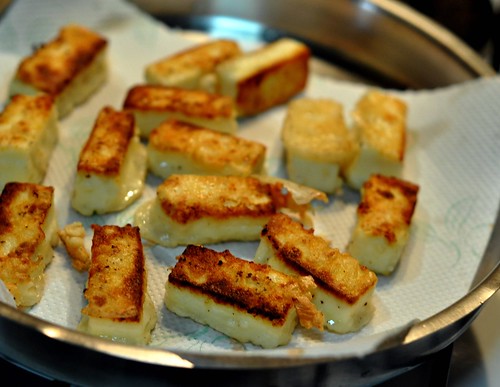
3.
Drain and set aside. Its okay to slightly burn a few sides, especially when you
are packing to move out of your apartment!
4.
In the same pan, add chopped onions, green chillies, and capsicum. Cook until
the onions turn transparent - 2-3 mins.
5.
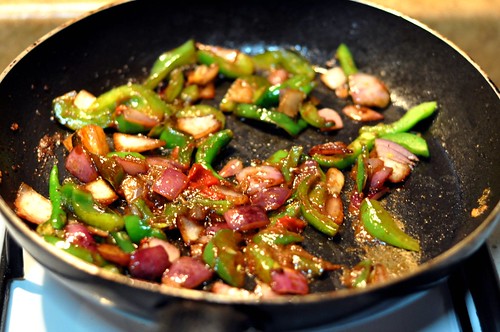
Next, turn the flame to high and add soya sauce, green chilli sauce, sugar and
tomato paste. Stir-fry on high for about 30 seconds until well blended and turn
the flame to medium-low.
6.
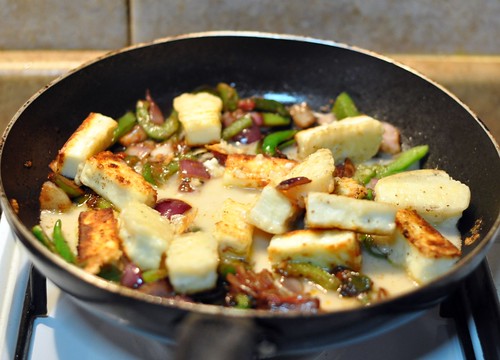
Add the fried paneer cubes and the cornflour-water paste. Taste and adjust salt
(since the sauces will have salt). Stir and cook for another 3-4 mins until the
sauce comes around and thickens due to the cornflour.
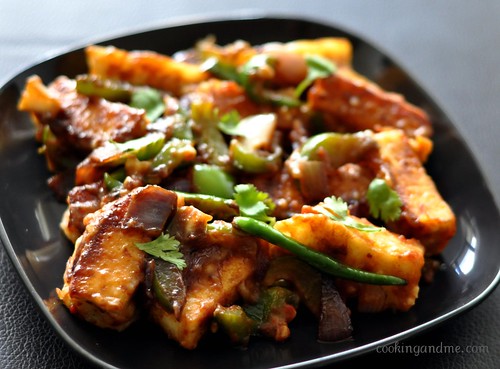
Serve
steaming hot as an appetizer!
This recipe is made from soaked and ground urad dal, flavored with chopped cabbage, green chillies and onions and steamed with a little oil in the Kuzhi paniyaram Pan . These vadas are exceptionaly tasty and healthy as well. Eliminates the hassels of getting the right shape as well. The vada tastes great in itself without the need for any accompaniments.


Makes: 20 vada’s
Ingredients
- 1 cup whole white urad dal (soaked for 3 hours)
- ½ cup finely chopped cabbage
- ½ cup finely chopped onions
- 1 teaspoon finely chopped ginger
- 1 teaspoon chopped green chilles
- ¼ finely chopped fresh coriander leaves
- Salt to taste
Method
Finely grind
the soaked urad dal with salt and adding as little water as possible into a
thick smooth paste.
Add the
chopped cabbage, onions, green chillies and coriander leaves and mix into the
ground urad dal paste.
Heat the Kuzhi paniyaram Pan and add a drop of oil to coat the
pan; once the pan is well heated scoop the dal mixture using a scoop spoon.
Cover the pan and allow it to steam . You will notice the top part of the vada
getting cooked. At this point you could add another drop of oil and then using a
tiny flat spoon gently flip the vada so it can get cooked from the other side
and crip as well. When you insert the back of the spoon or a knife in the center
it should come out clean - this the test to check whether it is hass been
cooked. Continue the same process with the remaining lentil batter and enjoy the
healthy version of the vada's.
Note: You could make plain vada's as well incase you want to use them for the dahi vada's. In this case, spoon the vada mixture which has salt into the pan and cook the same way as above. And follow he steps for the dahi vada process.
Note: You could make plain vada's as well incase you want to use them for the dahi vada's. In this case, spoon the vada mixture which has salt into the pan and cook the same way as above. And follow he steps for the dahi vada process.
Chocolate Cupcake Ingredients
3 cups all-purpose flour
2 cups granulated sugar
1/2 cup cocoa powder
2 teaspoons baking soda
1 teaspoon salt
2 cups hot water
3/4 cup vegetable oil
2 teaspoons white vinegar
1 tablespoon instant coffee crystals
1 tablespoon vanilla extract
Regular or silver cupcake paper liners
Directions
Preheat the oven to 350°F (177°C). In a large bowl, whisk together the dry ingredients. In a large measuring cup combine the water, oil, vinegar, instant coffee, and vanilla. Whisk it into the dry ingredients until just combined. Don't worry if there are a few lumps.
Line 2 muffin tins with cupcake liners and fill each 2/3 full of batter. Bake until wooden skewer comes out clean from the center, about 25 to 30 minutes. Cool the cupcakes completely before frosting.
Ice each cupcake with peanut butter frosting and sprinkle with favorite toppings.
Makes 24 cupcakes
[Recipe via Gale Gand]
Ingredients for one mini cake:mug cake
3 tbs plain flour
2 tbs cocoa powder
1/4 tsp baking powder
3 tbs sugar
1 egg
2 tbs milk
2 tbs vegetable oil
Splash of vanilla
Directions:
-Combine first four ingredients together and mix well. Add the rest of the ingredients and stir.
-Spray a wide cappuccino cup with a non-stick spray, or spread a little bit of oil in the cup.
-Add the cake mixture to the cup and cook in the microwave for about two minutes on high.
-Its a nice spongy texture but it can be a little dry, so I suggest adding fruit, icing, ice cream, chocolate sauce, or icing sugar. Serve immediately.
Grab a cup of tea or glass of milk and enjoy!
http://www.youtube.com/watch?v=j0BU4Qkayzs&feature=fvwrel
Peanut Butter Frosting Recipe
Peanut Butter Frosting Ingredients
2/3 cup confectioners' sugar
1 cup creamy peanut butter, natural or organic
4 tablespoons unsalted butter, at room temperature
3/4 teaspoon pure vanilla extract
1/8 teaspoon kosher salt
4 tablespoons unsweetened coconut cream
Directions
Place the confectioners' sugar, peanut butter, butter, vanilla, and salt in the bowl of an electric mixer fitted with a paddle attachment. Mix on medium-low speed until creamy, scraping down the bowl with a rubber spatula as you work.
Add the cream and beat on high speed until the mixture is light and smooth.
[Adapted from Ina Garten]
Tofu Chocolate Chip Cookies Recipe
SND Note: Oat flour contains no gluten and will not rise when baked. If you want some crumb to your cookies, mix the oat flour with some white whole wheat flour. If you don't like the taste of oat or wheat flour, use all-purpose flour instead, but you are giving up some nutritional value.
Ingredients:
7 ounces soft tofu (1/2 a square), roughly chopped
1/3 cup (3 ounces) cream cheese
1/3 cup (3 ounces) natural or organic salted, creamy peanut butter
3/4 cup white sugar
3/4 cup brown sugar
4 large egg whites
2 teaspoons vanilla extract
A touch of almond extract (optional)
2 1/2 cups oat flour or white whole wheat flour
1/4 cup semolina flour or cornmeal
1 teaspoon baking soda
8-10 ounces semisweet or bittersweet chocolate chips/chunks
Directions:
1) Adjust the oven racks to the upper- and lower-middle positions and heat the oven to 375°F. Line 2 large baking sheets with parchment paper or spray them with nonstick cooking spray.
2) Whisk the flour, semolina and baking soda in a medium bowl; set aside.
3) With an electric mixer, mix the tofu until smooth, about 1-2 minutes. Add cream cheese and peanut butter and beat until thoroughly blended. Add the sugars; mix until combined, about 2-3 minutes. Beat in the egg whites and vanilla until combined. Add the dry ingredients and beat at a low speed just until combined. Stir in chocolate chips to taste. Chill the dough in the refrigerator for 15 minutes.
4) Roll a scant 1/4 cup of the dough into a ball. Hold the dough ball with the fingertips of both hands and pull into 2 equal halves. Rotate the halves 90 degrees and, with jagged surfaces facing up, join the halves together at the base, again forming a single ball, being careful not to smooth the dough's uneven surface. Place the formed dough balls on the prepared baking sheets, jagged surface up, spacing them 1 1/2 inches apart.
5) Bake the cookies until light golden brown 13 to 16 minutes, rotating the baking sheets from to back and top to bottom halfway through the baking time. Cool the cookies on the sheets. Remove the cooled cookies from the baking sheets with a wide metal spatula.
Makes 28-30 cookies
Chewy Chocolate Chip Oatmeal Cookies Recipe
Makes about 18 Large Cookies
If you prefer a less sweet cookie, you can reduce the granulated sugar by 1/4 cup, but you will lose some crispiness. Do not overbake these cookies. The edges should be browned, but the rest of the cookie should be very light in color.
Ingredients:
1 1/2 cups (7 1/2 ounces) unbleached all-purpose flour
1/2 teaspoon baking powder
1/2 teaspoon salt
16 tablespoons (2 sticks) unsalted butter, softened but still cool
1 cup packed (7 ounces) light brown sugar
1 cup (7 ounces) granulated sugar
2 large eggs
3 cups old-fashioned rolled oats
1 1/2 cups semisweet chocolate chips
Directions:
1) Adjust the oven racks to the low and middle positions and heat the oven to 350 degrees. Line 2 large baking sheets with parchment paper or spray them with a nonstick cooking spray.
2) Whisk the flour, baking powder and salt together in a medium bowl.
3) Either by hand or with an electric mixer, beat the butter on medium speed until creamy. Add the sugars; beat until fluffy, about 3 minutes. Beat in the eggs, one at time.
4) Stir the dry ingredients into the butter-sugar mixture with a wooden spoon or large rubber spatula. Stir in the oats and chocolate chips.
5) Working with a generous 2 tablespoons of dough each time, roll the dough into 2-inch balls. Place the balls on the prepared baking sheets, spacing them at least 2 inches apart.
6) Bake until the cookie edges turn golden brown, 22 to 25 minutes, rotating the baking sheets front to back and top to bottom halfway through the baking time. Let the cookies cool on the baking sheets for 2 minutes. Transfer the cookies with a wide spatula to a wire rack. Let cool at least 30 minutes.
Oatmeal-Raisin Cookies or Date Oatmeal Cookies
Follow the recipe for Chewy Chocolate Chip Cookies, substituting 1 1/2 cups of raisons or 1 1/2 cups of chopped dates for the chocolate chips. Additionally, add 1/4 teaspoon freshly grated nutmeg with the dry ingredients.
[Recipe via Cook's Illustrated - The New Best Recipe cookbook]
Best Cocoa Brownies Recipe
SND Note: The recipe below is from Alice Medrich's Bittersweet cookbook. The ingredients and directions are the same except for step 2. The original direction was to add the butter, sugar, cocoa and salt in the bowl all at once and to melt the butter and make a smooth mixture, which takes forever. We think it's easier to melt the butter first then add the remaining ingredients. The next time we make this recipe, we would double it to make thicker brownies.
Ingredients
10 tablespoons (1 1/4 sticks) unsalted butter
1 1/4 cups sugar
3/4 cup plus 2 tablespoons unsweetened cocoa powder (natural or Dutch-process)
1/4 teaspoon salt
1/2 teaspoon pure vanilla extract
2 cold large eggs
1/2 cup all-purpose flour
2/3 cup walnut or pecan pieces (optional)
Special equipment: An 8-inch square baking pan
Directions
Position a rack in the lower third of the oven and preheat the oven to 325°F. Line the bottom and sides of the baking pan with parchment paper or foil, leaving an overhang on two opposite sides.
In a medium heatproof bowl, add the butter and set on top of a large sauce pan with barely simmering water. Melt the butter, then add sugar and salt, and stir until well combined. Next add the cocoa powder and stir until mixture is smooth and hot enough that you want to remove your finger fairly quickly after dipping it in to test. Remove the bowl from the skillet and set aside briefly until the mixture is only warm, not hot.
Stir in the vanilla with a wooden spoon. Add the eggs one at a time, stirring vigorously after each one. When the batter looks thick, shiny, and well blended, add the flour and stir until you cannot see it any longer, then beat vigorously for 40 strokes with the wooden spoon or a rubber spatula. Stir in the nuts, if using. Spread evenly in the lined pan.
Bake until a toothpick plunged into the center emerges slightly moist with batter, 20 to 25 minutes. Let cool completely on a rack.
Lift up the ends of the parchment or foil liner, and transfer the brownies to a cutting board. Cut into 16 or 25 squares.
Chocolate note: Any unsweetened natural or Dutch-process cocoa powder works well here. Natural cocoa produces brownies with more flavor complexity and lots of tart, fruity notes, which maybe more exciting for you. Dutch-process cocoa results in a darker brownie with a mellower, old-fashioned chocolate pudding flavor, pleasantly reminiscent of childhood.
Makes 16 large or 25 smaller brownies
[Recipe via Bittersweet: Recipes and Tales from a Life in Chocolate by Alice Medrich]
Chocolate Macadamia Nut Torte Recipe
Ingredients:
11 ounces salted macadamia nuts, ground
11 ounces semisweet chocolate
1 heaped teaspoon unsweetened cocoa powder
8 ounces unsalted butter
1/2 cup granulated sugar
6 large eggs, separated
1 teaspoon pure vanilla extract
Salt
Directions:
1) Preheat oven to 350°F (177°C). Line the bottom of an 8 to 10-inch springform pan with a piece of parchment paper before buttering the bottom and sides then dust with flour.
2) Place the nuts into a food processor and pulse until ground and set aside. Be careful not to over-process or you'll make macadamia butter. Add the chocolate and cocoa to processor and pulse for 30 seconds to break up the chocolate and set aside with nuts. Add the butter and sugar to the food processor and beat until pale and fluffy. Add vanilla and beat the egg yolks in one at a time. Then by hand mix together with the chocolate and nuts.
3) In another bowl beat the egg whites with a pinch of salt until they form stiff peaks. Gently fold the egg whites into the chocolate, butter and nut mix. Pour all the mixture into the cake pan. Bake in the preheated oven for 40-45 minutes. To test if the torte is cooked, insert a toothpick or the tip of a knife for 5 seconds; when removed it should be reasonably clean. Transfer to wire rack and cool for 15 minutes. Serve with whipped cream, ice-cream or powdered sugar.
[Recipe adapted from The Naked Chef Takes Off by Jamie Oliver]
Fabulous Fudge
Ingredients:
2 cups good quality dark cooking chocolate
2/3 cup condensed milk
1 Tbsp water
1/2 cup toasted then chopped walnuts
1/2 cup pistachio nuts - chopped
1 tsp vanilla
Falafel is a popular Middle Eastern chick pea patty. Falafel is stuffed in pita bread with salad and sauce.
Preparation Time: 15 minutes
Cooking Time: 30 minutes
Recipe serves 4.
Ingredients
Falafel
1 cup dried chick peas (garbanzo, kabli chana)
2 tablespoon chopped parsley
2 tablespoon chopped cilantro
1 green chili
About 1/4 inch piece of ginger
1 1/2 teaspoon salt adjust to taste
1 teaspoon cumin seeds
1 teaspoon red chili flakes
1/4 cup all purpose flour (plain flour, maida)
Also need oil to fry
Tahini Sauce
1/4 cup sesame seeds
1 1/4 teaspoon salt adjust to taste
2 tablespoons lemon juice
2 tablespoons olive oil
1/2 teaspoon cumin seeds
About 2 tablespoon chopped parsley
About 2 tablespoon chopped cilantro
1 green chili adjust to taste
About 1/4 cup water use as needed
Also Need
2 cups of thinly sliced lettuce
2 medium size chopped tomatoes
1/2 cup chopped cucumber
4 pocket pita bread
Method
Tahini Sauce
In a small frying pan dry roast the sesame seeds on medium heat for 2-3 minutes.
mix all the ingredients and blend to make a pourable paste use water as needed
Keep it aside.
Falafel
Soak the chickpeas in 4 cups of water over night. After soaking chickpeas will be about 2 and half time in volume.
In pressure cooker add chickpeas with the 3 cups of water. Close the cooker and put the pressure on.
Cook on medium high heat.
As pressure cooker starts steaming turn the heat down to medium and cook for about 4 minutes.
Close the heat and wait until steam has stopped before opening the pressure cooker. Chickpeas should be just tender not very soft.
Drain the water and let it cool; combine all the ingredients for falafel grind using food processor, mixture should be grainy. If needed add few spoons of water.
Divide the mixture in 24 equal parts or make them as desired size patties.
Heat oil in a frying pan on medium high heat.
The frying pan should have at least 1 ½ inch of oil. To check if the oil is ready, put small piece of dough in oil. The dough should come up but not change color right away.
Slowly drop the falafel patties in the oil and fry until they are brown in color both sides. It should take about 5-6 minutes to cook each batch.
Keep the patties aside.
Serving suggestion
Take pita bread and heat over the skillet on medium high heat both sides lightly.
Slice the pita bread from center in half take one part and open from center looking like a pocket.
Fill the pita pocket with chopped lettuce so it 1/3 full. Next add some chopped tomatoes and cucumber.
Pour about one tablespoon of tahini sauce, 3 to 4 pieces of falafel and again tahini sauce.
It’s best to serve the sandwich with hot falafels. Falafels can be easily re-heated before serving using an oven or toaster oven.
Variation
Serve the falafel over green salad use the tahini sauce as a dressing.
Chocolate Cake : VEG
This cake is happening ... the texture and the taste is out of the world. I used the common prescription of yogurt cake ... but with few changes ... Here is the recipe and the video will teach you how to do a cake
INGREDIENTS:
1 white yogurt 1 "as"
2 parts sugar
3 parts white flour (I mix white flour)
3 / 4 as sunflower oil
1 As milk
3 / 4 chopped almonds measure (the chop in the blender with the skin)
1 tablespoon vanilla soup good
type of yeast 1 royal
1 / 2 teaspoon baking soda
2 large eggs
FOR CHOCOLATE
use nutella
METHOD:
is all for the cake mixture as in the video and put in a greased pie pan and bake at 180 for and 50 minutes or more ... that afternoon but by the mass density
when this cold is smeared with Nutella
VEG manchurian
2 cups Grated Cabbage
2 Grated Carrots
1/2 onion finely chopped
1 Chopped Spring Onion
2 Chopped Green Chilies
3-4 Crushed Garlic Flakes and ginger chopped
2 tbsp Corn Starch or Flour
Oil for deep frying
1 tbsp Soya Sauce
Salt to taste
1 tsp Pepper Powder(kali mirch powder)
1/2 tsp Sugar(very little)
2 tbsp oil
Preparation of vegetarian Manchurian :
Veg balls
* Mix grated cabbage and carrots and squeeze the water out from
them,then add onion to that
* Now in a bowl take the squeezed cabbage and carrots and mix 1
tbsp. corn starch and add few chopped chilies and little salt to it.or
you can add some maida if you want
* Make small balls (like koftas) of the mixture .
* Heat the oil in a kadhai / wok and deep fry the balls till
golden brown, drain and keep aside.
Sauce
* Now in a separate pan heat 2 tbsp oil.
* Sauté garlic, green chilies and spring onions and ginger for few seconds
* Add pepper powder, sugar and soya sauce then put some water
not too much lets say 1 1/2 cup then Bring it to a boil.
* Mix 1 tbsp corn foulr with half of a cup of cold water and stir
into it. Gently add the fried balls to the gravy.
* Cook the vegetable manchurian for 3-4 minutes and in the end put
1 tbs vinegar for spicy Manchurian put more green chillies and hot
sauce .
Whole Cauliflower in Gravy (Gobhi Musallam)
21 Sunday Aug 2011
Posted by CK in Cauliflower, Gravy, Wholemeal
≈ 2 Comments
Tags
Cauliflower, Gobhi,Gobhi musallam, Gravy
3 Votes
http://cookitdaily.files.wordpress.com/2011/08/pic5.jpg
Items needed:
One whole fresh cauliflower
One slice of smoked cheese
One spoon of desi ghee
For Gravy:
One big potato
One big onion
Two big tomato
One teaspoon fine cut chili and ginger
Various Spices and herbs
For Green sauce:
Half cup mint leaves
Half cup coriander leaves
One green chili
Half tomato
Salt and pepper to taste
Process:
Boil the whole cauliflower, add a pinch of salt. (Don’t over boil, it shall remain a bit solid and keep the shape)
OR
Use baking oven to bake the whole cauliflower, with sprinkle of salt and pepper
>
Gravy
Grind the raw potato, onion, garlic and ginger and make thick paste
Grind tomato and chili separably
Now take half a spoon of ghee in frying pan, add various spices such as Cumin seeds, Fennel seeds, Coriander seeds, Mustard seeds, Trachysermum Copticum seeds
Fry onion, potato paste in this, keep it mixing with spices, so that it doesn’t stick to the pan, once this paste turns golden brown, add tomato chili paste and keep on frying with added garam masala, or you can use chicken masala OR pavbhaji masala
Add a spoon of taramind juice in this paste, and cook till it become thick curry.
http://cookitdaily.files.wordpress.com/2011/08/pic1.jpg
http://cookitdaily.files.wordpress.com/2011/08/pic2.jpg
Green sauce:
Grind mint, coriander leaves with tomato and chili
Add salt and pepper to taste
Complete preperation
Take the boiled cauliflower, keep it pan till the water vaporizes
Fry it all sides, try to keep the shape of whole cauliflower
Once it is well cooked, and turned a bit brown, add cheese on the top of whole cauliflower
OR
If cooked in baking over, take it out hot and add cheese on the top of whole cauliflower
Serve it hot in the plate, spread the gravy on complete cauliflower, and little green sauce.
This is good to eat with naan, kulcha or even fried rice.
http://cookitdaily.files.wordpress.com/2011/08/pic6.jpg
Ingredients;
(10-12 crackers)
1 cup whole wheat flour
1/2 cup Flax seeds
2 tbsp. sesame seeds
1/4 cup melted butter/ghee/oil
2 tbsp. powder sugar
1/4 tsp. salt
1/4 tsp. baking powder
A few tsp. milk
Method; Pre heat oven to 375°F or 180°C for 10 minutes.
Dry roast flax and sesame on slow heat for a few minutes. Take a large vessel and add flax seeds, sesame seeds, wholewheat flour, salt, powder sugar, baking powder and mix well with a fork.
Add melted butter (I added ghee, clarified butter) and mix the dry ingredients with light hands till it resembles coarse bread crumbs. Pour milk little by little till all the ingredients bind together to form a hard ball. Avoid adding too much milk if you want to get crisp crackers.
Take out the ball of dough and knead it on a floured surface to make a large circle. It will be difficult to knead the dough as the flax seeds will keep coming out. Press them again in the dough and mend any cracks and breaks in the flattened circle with hands.
Roll it as thin as you can without breaking and cut it into squares or rectangles with a Sharpe knife.
Arrange all the crackers on a greased baking tray and bake at 180°C for 15 minutes or till the crackers are slightly brown at the edges. Just keep in mind that the thinner the crackers are less time it will take to bake and vice versa.
Take out the baking tray and let it cool completely before biting into these addictive Flax seed wholewheat crackers.
http://litebite.in/recipe-flax-seed-crackers/
Grated fesh sweet corn
Ingredients;
(serves 2)
1 medium size sweet corn
1 cup coconut milk or normal skimmed milk
1/4 cup sugar
1 tsp. cardamom powder
Edible silver foil (optional)
Method: The recipe require extremely soft, tender & fresh corn. Clean & prep the fresh corn and remove all the husk from it. There are two different ways you can take out the corn kernels from it;
Grate the corn from all the side.
Scrape the corn with a sharp knife and take out all the fresh kernels.
If the corn is soft and tender you can use it as it is, else grind it in a mixer and make a coarse paste.
If you want a vegan version and are using coconut milk you need to grate the flesh of coconut and squeeze it to take out the milk from it. I used store bought coconut milk in a sachet which makes the work easy.
Heat a heavy bottom pan and pour the coconut milk (or normal milk) in it. Bring it to boil and add the grated fresh corn into it. Let it boil on medium heat. Keep stirring the mixture to avoid scalding of milk.
Looks pretty with edible silver foil..
Boil the corn milk mixture till it becomes thick, this will take about 10-12 minutes. Remove from heat and add the sugar in it. Mix it well to dissolve the sugar. Add the cardamom powder in it.
Cool it a little and fill it in individual mud pot and decorate it with a small piece of edible silver foil. Refrigerate the pudding for 3-4 hours.
The Fresh Corn Pudding should be best enjoyed when cold and served in an earthen ware. But this is how I served mine as the mud pot are difficult to get here. The purpose to serve in earthen ware is to give the pudding a rustic feel and earthy aroma. Beside these factors it also helps in making the pudding thicken faster by absorbing extra liquid from it.
You can bake the pudding for a much delightful version of the recipe. For baking just mix all the ingredients and bake it in a bake proof dish at 180°C for about 20 minutes. Refrigerate and serve the corn pudding cold.
Notes;
Add 1-2 tbsp. of condensed milk after the corn pudding is done to make it more rich and creamy in consistency.
Fresh cream would also be wonderful for a real royal treat. Add the cream after the cooking process is over.
Sprinkle chopped pistachios over the healthy pudding.
Increase or decrease the quantity of sugar as you desire.
You can try using other sugar substitutes to make it more healthy.
I have not tried this recipe in almond milk but must taste wonderful in almond milk as well.
http://litebite.in/easy-corn-pudding-vegan-recipe/
Chocolate & Vanilla Bread Pudding – Two Easy Eggless Desserts with Custard
1. Vanilla Custard Bread Pudding
8 bread slices or 2 cups bread torn into pieces
1 1/2 cups milk
1/2 cup raisins and Goji berries
1/2 cup brown sugar
1 tbsp. vanilla custard powder
1 tbsp. butter
1 tbsp. dessicated coconut
1 tsp. cinnamon powder
2. Chocolate Custard Bread Pudding
8 bread slices or 2 cups bread torn into pieces
1 1/2 cups milk + 1 tbsp. milk
1/2 cup raisins
1/2 cup brown sugar
1 tbsp. vanilla custard powder
1 tbsp. cocoa powder
1 tbsp. butter
1 tsp. cinnamon powder
Method; Tear the bread slices into small bits. Add 1 tbsp. of milk in the custard powder and dissolve it well. Take milk, sugar, cinnamon powder and custard powder mix in a large vessel and stir till the sugar is dissolved.
For the chocolate pudding dissolve cocoa powder in 1 tbsp. milk add it to the custard mixture and follow the rest of the recipe.
Soak the raisins and Goji berries (if using) in a little milk for about 5 minutes.
Grease 4 Ramekins (small ceremic bowl) with little butter and preheat the oven at 190°C for 10 minutes.
With custard drizzled on top.
Fill the ramekins with the bread pieces and add the raisins and Goji berries over it and add 1/2 tbsp butter on it. Pour the custard over the bread pieces add rest of the butter and bake it at 190°C for about 30-35 minutes till the top appears golden brown in colour.
Hot from oven...
Look at the warm golden brown bread pudding…just a drizzle of sauce and you are ready to dig in.
Sitting pretty..
You can eat the pudding from the Ramekin itself, I took it out for the picture. The chocolate bread pudding is assembled by both the kids, you could see streaks of plain bread peeping out :)
Add fruits like chopped apples, banana, mango, pears and strawberries in the pudding for more flavors and nutrition.
Serve the pudding warm with honey, caramel, maple syrup, yogurt sauce, chocolate sauce or just as plain dessert.
https://picasaweb.google.com/lh/photo/fdnhZjp3EuYVBJyvFD-9JdMTjNZETYmyPJy0liipFm0?feat=embedwebsite
Zucchini & Carrot Wholegrain Biscotti – A Healthy Tea Time Munch
Ingredients;
(makes 12 slices)
1 cup wholewheat flour
1/4 cup oatmeal flour
1 cup grated Zucchini & carrot
1 tbsp. yogurt/curd
1/2 cup sugar
2 tbsp. vegetable oil
1 tsp. cinnamon powder
1 tbsp. of raisins and black current
1 tsp. baking powder
1/2 tsp. baking soda
A pinch of salt
The dough is slightly wet due to veggies in it..
Method; Wash and scrub carrots. Grate zucchini & carrots. Grind the oatmeal into fine powder. Mix both the flours, baking powder, baking soda, salt. dried fruits and cinnamon powder in a large bowl.
Take another vessel and add grated veggies, oil, yogurt and sugar in it. Whisk it well till the sugar is dissolved.
Grease a baking tray with oil or line it with a parchment paper. Preheat the oven for 10 minutes at 190°.
Pour the wet ingredients into the dry ingredients and mix well. Make a semi solid dough. Grease your hands with a little oil or just dust them with dry flour.
Make a rectangular dough or about 4 inch wide and 1 inch thickness on the greased baking tray. Bake it for 25 minutes at 190°C.
1st bake and the soft veggie cake slices..
Remove and let it cool completely for 15 minutes.
Slice the baked loaf crosswise into 1/2 inch pieces using a sharp knife. Place the cut side up and arrange all the slices on a baking tray. Bake it at 190°C for 7-8 minutes till they become slightly brown.
Hot and fresh from the oven..
Turn them to other side and bake again for 6-7 minutes at190°C.
Crunchy bites..
Take out the baking tray and let it cool. Store the Biscotti in an air tight container for up to a week. Serve the Bisotti plain or smeared with fresh fruit preserve with hot milk or tea.
http://litebite.in/zucchini-carrot-wholegraint-biscotti/
Method:
Use a double boiler to melt chocolate. Add condensed milk, water and vanilla and stir to combine well. Add chopped nuts.
Pour into a lined small slice tin. Chill in fridge before cutting into squares.
Store in pretty glass jars, dressed with fabric and ribbon. Great home made Christmas gift.
(
Recipe
will make 16 brownies.
 by Manjula") Ingredients:
Ingredients:- 1/2 cup vegetable oil
- 1/2 cup cocoa powder
- 1 cup sugar
- 1/2 cup silken tofu
- 2 teaspoons vanilla extract
- 1/2 cup all purpose flour (maida, plain flour)
- 1/4 teaspoon salt
- 1/2 teaspoon baking soda
- 1/4 cup chopped walnuts
Method
- Preheat the oven to 350 degree F/180c. Grease the 8×8-baking pan.
- Mix the tofu until it is smooth.
- Mix flour, salt and baking soda, set aside.
- In a mixing bowl stir together the oil, cocoa powder and sugar until its well blended. Then stir in the mixed tofu and vanilla.
- Add the flour mix and once its well-mixed, then fold-in walnuts.
- Pour the mixture into a greased baking pan evenly and bake it for 25 to 30 minutes. Place the pan on the middle oven tray.
- Once the brownies are baked, let them cool to room temperature before cutting the brownies into squares. Cutting too early will make the brownies to crumble.
Suggestions
- Replace the walnuts with chocolate chips
- Serve with scoop of ice cream
Dahi Bhindi
by Tarla Dalal
Ingredients
For the bhindi
Tips
by Tarla Dalal
1
1/2 cups cooked
rice
by Tarla Dalal
For The Pita Bread3/4 cup whole wheat flour (gehun ka atta)
For the paneer coleslaw
How to proceed
by Tarla Dalal
the paneer tikka filling1
cup low fat paneer (cottage cheese) cubes
For the paneer tikka filling
For the chapatis
How to proceed
For The Hara Chutney (makes Approx 7
Tbsp)1
cup chopped coriander (dhania)
For The Spicy Sauce2 tbsp vinegar
-1783.jpg)
4
cups (bhindi) ladies finger, cut 1/2"
pieces
1
tsp cumin seeds (jeera)
1
tsp mustard seeds ( rai / sarson)
1
tbsp urad dal (split black lentils)
3 whole dry kashmiri red chillies, broken into pieces
5
to 6 curry leaves (kadi patta)
1/2 cup chopped onions
1 cup chopped tomatoes
1
tsp chilli powder
1/2 tsp turmeric powder (haldi)
1/4 cup fresh
curds (dahi)
3
tbsp oil
salt to
taste
To be ground into a paste1/2 cup freshly grated coconut
2 tbsp broken cashewnuts (kaju)
Method
For the bhindi
- Heat the oil in a pan and sauté the lady fingers in oil until crisp. Remove and drain on absorbent paper.
- Heat the oil again; add the cumin seeds, mustard seeds and urad dal. When they crackle, add the red chillies and curry leaves.
- Add the onions and sauté until it is golden in colour.
- Add the tomatoes, chilli powder, turmeric powder, the ground paste and salt and fry until the oil comes out from the sides.
- Add 1¼ cups of water to the curds, beat well and add it to the mixture.
- Add the sautéed bhindi and cook for a few minutes.
- Serve hot.
Tips
- If you don't wish to deep fry the bhindi you can sauté it. But the bhindi.
Curd Rice ( South Indian Recipes )
by Tarla Dalal
Ingredients
1
1/2 cups cooked
rice
2
cups fresh curds
(dahi)
1
tbsp coconut oil or any other oil
1 tsp mustard seeds ( rai / sarson)
1
tsp cumin seeds (jeera)
1
tbsp urad dal (split black lentils)
1
to 2 green chillies , slit
4 to 6 curry leaves (kadi patta)
1/2 tsp asafoetida (hing)
salt to
taste
2
tbsp chopped coriander (dhania) for the garnish
Method
- Combine the rice and curds together in a bowl and keep aside.
- Heat the oil in a kadhai and add the mustard seeds.
- When the seeds crackle, add the cumin seeds, urad dal, green chillies, curry leaves and asafoetida and sauté on a medium flame for a minute while stirring continuously.
- Add the rice-curds mixture and salt, mix well and cook for another minute. Serve hot garnished with coriander.
Paneer Pita Pockets
by Tarla Dalal

For The Pita Bread3/4 cup whole wheat flour (gehun ka atta)
3/4 tsp fresh yeast , crumbled
1/4 tsp sugar
1/2 tsp salt
1/2 tsp oil for
kneading
To Be Mixed Into A Marinade2
tbsp oil
1 tsp. lemon juice
12 mm. (
1/2”) grated ginger (adrak)
salt to
taste
2
tbsp chopped coriander (dhania)
1
tsp finely chopped garlic (lehsun)
For The Paneer Coleslaw1/2 cup paneer , cut
into 12 mm. ( 1/2”) cubes
1
cup shredded cabbage
1/2 cup grated carrot
1/4 cup eggless mayonnaise
1/4 tsp mustard powder
1 to 2 tsp lemon juice
salt to
taste
Method
For the pita bread
For the pita bread
- Combine all the ingredients in a bowl and knead into a soft dough using enough water until it is smooth and elastic.
- Add the oil and knead again till smooth.
- Cover the dough with a wet muslin colth and allow it prove till it doubles in volume (approx. 15 to 20 minutes).
- Press the dough lightly to remove the air and divide it into 4 equal portions.
- Roll out each portion into a circle of 100 mm. (4") diameter and 6 mm. (¼") thickness.
- Cook the pita breads on a hot tava (griddle) on a medium heat on each side for a minute or till the bread puffs up and a cavity is created in the bread.
- Cut each pita bread into 2 halves and keep aside.
For the paneer coleslaw
- Combine the paneer and the prepared marinade in a bowl, mix gently and marinate for at least 20 minutes.
- Add all the remaining ingredients,mix gently andrefrigerate for ½ an hour.
- Divide the coleslaw into 4 equal portions and keep aside.
How to proceed
- Just before serving, warm the pita bread halves on a tava (griddle) stuff each with a portion of the coleslaw and serve immediately.
Paneer Tikka Kathi Rolls
by Tarla Dalal

For
the paneer tikka filling1
cup low fat paneer (cottage cheese) cubes
1/2 cup deseeded and cubed tomato
1/2 cup capsicum cubes
1 tsp oil
To be mixed into a marinade1/4 cup low fat curds (dahi), beaten
1 tsp chilli powder
1/4 tsp turmeric powder (haldi)
1/2 tsp ginger (adrak) paste
1/4 tsp garlic (lehsun) paste
1/4 tsp besan
(Bengal gram flour)
1/2 tsp chaat masala
1/2 tsp dried fenugreek leaves (kasuri methi)
1/2 tsp garam masala
salt to
taste
For the chapatis1
cup whole wheat flour (gehun ka atta)
1
cup low fat milk
salt to
taste
Method
For the paneer tikka filling
- Add the paneer and tomatoes to the prepared marinade and toss lightly.
- Leave aside for 10 minutes.
- Heat the oil in a non-stick pan, add the capsicum and sauté for 2 minutes.
- Add the paneer mixture and sauté over a high flame for 4 to 5 minutes, stirring occasionally.
For the chapatis
- Combine all the ingredients and knead into a soft dough.
- Divide the dough into 9 equal portions.
- Roll out each portion into a thin chapati.
- Cook each chapati lightly on a tava (griddle) on both sides. Keep aside.
How to proceed
- Divide the paneer tikka filling into 9 equal portions.
- Spread one portion of the filling in the centre of each chapati and roll up tightly.
- When you want to serve, cook the rolls on a hot tava (griddle).
- Cut into 50 mm. (2") long pieces and serve hot.
Tips
- Wrap each roll in a lettuce leaf as I have done in the picture . You can also use a scooped carrot slice to hold the roll together. It is easy and l
Chatakedar
Paneer
Ingredients
400 gms paneer , cut into 25 mm (1”) cubesand
deep-fried
400 gms paneer , cut into 25 mm (1”) cubesand
deep-fried
1
tbsp oil
1/2 tbsp green chilli paste
1/3 cup finely chopped tomatoes
2
1/2 tbsp tomato
puree
1
tsp chilli powder
1 1/2 tsp coriander (dhania) seed powder
1
tsp pav bhaji masala
1/2 tsp dried fenugreek leaves (kasuri methi)
salt to
taste
1
tbsp lemon juice
Method
- Heat the oil in a kadhai, add the green chilli paste and sauté for 30 seconds.
- Add the tomatoes, tomato puree , chilli powder, coriander seeds powder, pav bhaji masala, dried fenugreek leaves and salt, mix well and cook on a medium flame for 3 to 5 minutes, stirring once in between.
- Add the fried paneer cubes and sauté for 2 to 3 minutes on a medium flame.
- Remove from the flame, add the lemon juice and mix well. Serve hot.
Hara
Tava Paneer ( Healthy Starter Recipe
For The Hara Chutney (makes Approx 7
Tbsp)1
cup chopped coriander (dhania)
3
tbsp fresh grated coconut
3/4 tsp sugar
1 tbsp lemon juice
2 green chillies , chopped
salt to
taste
2
tbsp low-fat curds (dahi)
Other Ingredients20 pieces low-fat paneer (cottage cheese) , cut into 25 mm.
(1”) x 25 mm. (1”) pieces
3/4 cup boiled sweet corn kernels (makai ke dane)
a pinch of sugar
a pinch of salt
2 tsp finely chopped coriander (dhania)
2
tbsp low-fat milk (99.7% fat-free , readily available in the
market)
3
tsp oil for
cooking
1/4 cup finely chopped onions
Method
For the hara chutney
How to proceed
For the hara chutney
- Combine all the ingredients, except the curds, and blend it in a mixer to a smooth paste.
- Transfer it to a bowl, add the curds and mix well. Keep aside.
How to proceed
- Cut each piece of paneer into half to get 40 pieces of 25 mm. (1”) x 12 mm. (½”)
- Combine the paneer pieces and 5 tbsp of the hara chutney in a bowl, toss gently and keep aside to marinate for 30 minutes.
- Meanwhile combine the corn, sugar, salt and the remaining 2 tbsp of the hara chutney and blend in a mixer to a coarse paste.
- Transfer the paste to a bowl, add the coriander and milk and mix well. Keep aside.
- Heat 1½ tsp of oil in a broad non-stick pan, add the onions and sauté on high flame till the onions turn translucent.
- Add the corn mixture and sauté on a medium flame for another 2 to 3 minutes.
- Remove from the flame and cool slightly.
- Divide the filling into 20 equal portions and keep aside.
- Place a piece of paneer on a dry flat surface and spread a portion of the filling evenly over it.
- Sandwich it using another piece of paneer and press gently.
- Repeat with the remaining ingredients to make 19 more stuffed paneer pieces.
- Heat the oil in a non-stick tava (griddle) and cook the stuffed paneer pieces, using the remaining 1½ tsp of oil till they are golden brown in colour from both the sides.
- Serve hot.
Steamed
Paneer Dumplings With Spicy Sauce
For The Spicy Sauce2 tbsp vinegar
1 tbsp tomato ketchup
1 tsp red chilli paste
3/4 tsp sugar substitute
For The Paneer Dumplings1/2 cup grated low-fat paneer (cottage cheese)
1/4 cup finely
chopped and boiled mixed vegetables (carrots, green peas and
french beans)
1 tbsp chopped dill leaves (shepu / suva bhaji)
2
tsp semolina (rava /sooji )
2
tsp quick
cooking rolled oats
2 tsp finely chopped green chillies
1/4 tsp baking powder
1/4 tsp sugar substitute
salt to
taste
Other Ingredients8 thick carrot sticks , 75 mm (3”)
long
Method
For the spicy sauce
For the paneer dumplings
For the spicy sauce
- Combine all the ingredients, except the sugar substitute, in a broad non-stick pan and mix well.
- Bring to boil, while stirring continuously and keep aside to cool.
- Add the sugar substitute and mix well. Keep aside.
For the paneer dumplings
- Combine all the ingredients in a bowl and mix well. Divide the mixture into 8 equal portions and roll out each portion into small round balls.
- Steam the balls in a steamer for 5 to 7 minutes.
- Cool slightly, pierce each dumpling on a carrot stick and serve immediately with the spicy sauce
Paneer
and Tomato Skewers ( Paneer Snacks )
ngredients
16 bread slices
, with crust trimmed
16 bread slices
, with crust trimmed
oil for
brushing
1
1/4 cups paneer , cut
into 25 mm. (1”) cubes
5 tomatoes ,
deseeded and cut into 25 mm. (1”) cubes
1 cup fresh basil leaves
salt and to
taste
1/2 tbsp lemon juice
1 tsp dried mixed herbs
2
tbsp chopped coriander (dhania)
Method
- Cut each slice of bread into four equal slices, brush each slice with a little oil and toast in a pre-heated oven at 220ºc (450ºf) for 3 to 5 minutes or till they turn golden brown in colour. Keep aside.
- Combine the paneer, tomatoes and basil leaves in a bowl.
- Add the salt, pepper, lemon juice, dried herbs and 3 tbsp of coriander and toss lightly. Keep aside for 10 minutes
- On a skewer, arrange one piece each of toasted bread, paneer cube, tomato cube and some basil leaves.
- Repeat with the remaining ingredients to make more skewers.
- Bake in a pre-heated oven at 200°c (400°f) for 5 to 7 minutes or till the paneer turns golden brown in colour. Serve hot garnished with remaining coriander.
4 વ્યક્તિઓ માટે બનાવો સેવખમણી
સામગ્રી:
2 કપ ચણાની દાળ
10 કળી લસણ
1 નાનો ટુકડો આદુનો
2 ટીસ્પૂન રાયના દાણા
1 ટીસ્પૂન હળદર પાવડર
1 ટીસ્પૂન ધાણા-જીરુ પાવડર
1 ચપટી હીંગ
5-7 ઝીણા સમારેલા લીલા મરચાં
2-3 લીમડાંના પાન
2 ટીસ્પૂન ખાંડ
2 ટેબલસ્પૂન લીંબુનો રસ
1 કપ દૂધ
સ્વાદ અનુસાર મીઠું
1/2 કપ સમારેલી કોથમીર
1 કપ ઝીણી સેવ
1 કપ દાડમના દાણા
તેલ
રીત:
- ચણાની દાળને 3-4 કલાક સુધી પાણીમાં પલાળી રાખો. નિતારીને તેને ગ્રાઈન્ડ કરી લો અને જરૂર પડે તો થોડું પાણી ઉમેરો.
- આદુ, લસણ અને મરચાંને એકસાથે પીસી લો.
- એક ઊંડા પેનમાં તેલ ગરમ કરો. તેમાં રાયના દાણા ઉમેરો. રાયના દાણા ફૂટી જાય એટલે હીંગ ઉમેરો.
- ત્યારબાદ લીમડાના પાન, લસણ, આદુ અને લીલા મરચાંની પેસ્ટ ઉમેરીને એક મિનીટ સુધી સાંતળો.
- હવે તેમાં પીસેલી ચણાની દાળ, હળદર અને ધાણા-જીરુનો પાવડર ઉમેરો.
- ધીમી આંચ પર પાકવા દો. જો ચણાની દાળ બહુ સૂકી થઈ જાય તો દૂધ ઉમેરો.
- તેમાં મીઠું, લીંબુનો રસ અને ખાંડ ઉમેરો. બરાબર મિક્સ કરો અને તેલ છૂટુ ન પડે ત્યા સુધી પાકવા દો.
- સર્વ કરતા પહેલા લીલા ધાણા અને દાડમના દાણાથી ગાર્નિશ કરો. તેના પર ઝીણી સેવ ભભરાવો.
નાસ્તામાં બનાવો પસંદીદા
'ખાંડવી'
સામગ્રી
1 કપ ચણાનો લોટ
1/2 ટી સ્પૂન લીંબુનાં ફુલ
1/4 ટીસ્પૂન હળદર
1 કપ છાશ
1 1/2 કપ પાણી
2 ટેબલ સ્પૂન તેલ
1/2 ટી સ્પૂન રઈ
1 ટી સ્પૂન તલ
3-4 લીલા મરચાં
4 ટેબલ સ્પૂન કોથમીર
2 ટેબલ સ્પૂન કોપરાની છીણ
મીઠું સ્વાદઅનુસાર
રીત
-ચણાના લોટમાં મીઠું, લીંબુના ફુલ, હળદર, છાશ અને પાણી નાખી ખીરુ બનાવો
-તેને ગેસ પર ગરમ કરો અને હલાવતા રહો
-થોડુ જાડું કે જેને પાથરતાં તે ઉખડી શકે તેવું ઘટ રાખો
-તેને થાળીમાં કે કુંકિંગ સ્ટેડ પર પાથરી ઠરી જાય એટલે ગોળ ગોળ વીંટા વાળી લો
-ગેસ પર એક વાસણમાં તેલ, રાઈ, તલઅને લીલાં મરચાં નાખી વઘાર તૈયાર કરો
-વઘાર વીંટા ઉપર રેડો તેમજ કોથમીર અને ટોપરાંની છીણથી ગાર્નિશ કરો
નાસ્તામાં બનાવો બ્રેડ ઈડલી
સામગ્રી :
બ્રેડની સ્લાઇસ - ૬ નંગ
બાફેલાં બટાકા - ૨ નંગ,
સમારેલાં લીલા મરચાં - ૧ ચમચી,
ધાણાનો પાઉડર - ૧ ચમચી,
સમારેલી કોથમીર - ૧ ચમચો,
જીરું, અડદની દાળ, રાઇ - ૧ ચમચી,
દહીં - ૧ કપ,
તેલ - ૨ ચમચા,
મીઠું - સ્વાદ મુજબ
રીત :
-બટાકાને બાફી, છોલીને તેનો છુંદો કરી લો. તેમાં બારીક સમારેલાં લીલા મરચાં, કોથમીર, ધાણાનો પાઉડર અને મીઠું નાખી બરાબર મિકસ કરો.
-દહીંને સહેજ વલોવી નાખો. એક પેનમાં અડધી ચમચી તેલ ગરમ કરી તેમાં જીરું, રાઇ અને અડદની દાળનો વઘાર કરો
-તેને વલોવેલા દહીંમાં રેડો. બ્રેડને વાટકી કે ગોળ ઢાંકણાની મદદથી ગોળાકાર કાપી લો.
-તેની એક બાજુએ બટાકાનું મિશ્રણ લગાવો. બ્રેડના બીજા ભાગ પર બે ચમચી દહીંનું મિશ્રણ પાથરી દો અને ફ્રાઇંગ પેનને બે મિનિટ માટે ઢાંકીને રાખો.
-લો તૈયાર છે ટેસ્ટી બ્રેડ ઇડલી
ઘરે જ બનાવો ડ્રાય વેજ મન્ચુરિયન
સામગ્રી:
3 કપ સમારેલી કોબીજ
1 કપ સમારેલા ગાજર
3 થી 4 ટેબ.સ્પૂન મેંદો
3 થી 4 નંગ લીલા મરચા ઝીણા સમારેલા
1 નાનો કટકો આદુ
2 થી 3 કળી લસણ
1 ટેબ.સ્પૂન કોથમીર
1/4 ટી.સ્પૂન મરી પાવડર
ચપટી આજી નો મોટો
સ્વાદ પ્રમાણે મીઠું
2 નંગ ડુંગળી
(6 થી 7 નંગ લીલી ડુંગળી પાન સાથે)
તળવા માટે તેલ
કોટિંગ માટે:
1 1/2 ટેબ.સ્પૂન તેલ
3 થી 4 નંગ લીલા મરચા
3 થી 4 કળી લસણ
2 ટેબ.સ્પૂન કોર્ન ફ્લોર
2 ટેબ.સ્પૂન સોયા સોસ
ચપટી આજી નો મોટો
પાણી
ગાર્નીશિંગ માટે:
ઝીણી સમારેલી કોથમીર
ઝીણા સમારેલા લીલા લસણ ના પાન
રીત:
-ડ્રાય વેજ.મન્ચુરિયન બનાવવા માટે સૌ પ્રથમ કોબીજ અને ગાજર ને બારીક સમારી લો.
-લીલા મરચા ને પણ ઝીણા સમારી લો.આદુ અને લસણ ને ક્રશ પણ કરી લો
-કોથમીર ને ઝીણી સમારી લો.ડુંગળી ઝીણી સમારી લો.(લીલી ડુંગળી હોય તો પાન સાથે ઝીણી સમારી લેવી.)
-1/4 કપ પાણી માં સોયા સોસ અને કોર્ન ફ્લોર મિક્સ કરી ગ્રેવી તૈયાર રાખવી.
રીત:
મન્ચુરિયન માટે:
-ડ્રાય વેજ.મન્ચુરિયન બનાવવા માટે સૌ પ્રથમ ઝીણી સમારેલી કોબીજ,ગાજર,આદુ,મરચા,કોથમીર,લસણ મિક્સ કરવા
-ત્યાર બાદ તેમાં સ્વાદ પ્રમાણે મીઠું,મરી પાવડર અને આજી નો મોટો નાખી ને તરતજ જેટલો ભળે તેટલો જ મેંદો નાખવો.
-ગરમ તેલ માં નાના નાના મન્ચુરિયન વાળી ને તળી લેવા.
કોટિંગ માટે:
-બીજી એક કઢાઈ માં તેલ મૂકી તેલ ગરમ થાય એટલે તેમાં ગેસ ફાસ્ટ જ રાખી ને ડુંગળી અને મરચા સાંતળવા.
-ત્યારબાદ તેમાં ગેસ ફાસ્ટ જ રાખી ને આજો નો મોટો અને લસણ ઉમેરો
-હવે ગેસ ધીમો કરી તેમાં સોયા સોસ ની તૈયાર કરેલી ગ્રેવી ઉમેરો.ગ્રેવી ઘટ્ટ થવા દો.
-ગ્રેવી ઘટ્ટ થાય એટલે તેમાં તૈયાર કરેલા મન્ચુરિયન બોલ્સ નાખી ૨ મિનીટ માટે ગરમ કરવું.
-તૈયાર ડ્રાય વેજ.મન્ચુરિયન ને ઝીણી સમારેલી કોથમીર અને લીલા લસણ ના ઝીણા સમારેલા પાન વડે ગાર્નીશ કરી ગરમ ગરમ સર્વ કરવા.
ખસ્તા કચોરી
સામગ્રી:
કણક માટે:
2 કપ મેંદાનો લોટ
1/2 ટીસ્પૂન મીઠું
1/4 કપ ઘી
પૂરણ માટે
1/2 કપ પીળી મગની દાળ
1 ટીસ્પૂન જીરું
1/4 ટીસ્પૂન હીંગ
1/2 ટીસ્પૂન આદુની પેસ્ટ
1/2 ટીસ્પૂન લીલા મરચાંની પેસ્ટ
1 ટીસ્પૂન લાલ મરચાંનો પાવડર
1 ટીસ્પૂન ગરમ મસાલો
1 ટેબલસ્પૂન આમચૂર
2 ટેબલસ્પૂન બેસન
3 ટેબલસ્પૂન તેલ
સ્વાદ અનુસાર મીઠું
તળવા માટે તેલ
પાણી જરૂર પ્રમાણે
ગાર્નિશ કરવા માટે:
2 કપ દહીં
લીલી ચટણી
ખાટી-મીઠી ચટણી (આંબલી-ખજૂર)
લાલ મરચાંનો પાવડર જરૂર પ્રમાણે
શેકેલા જીરુનો પાવડર
સમારેલા લીલા ધાણા
સ્વાદ અનુસાર મીઠું
રીત: કણક
- બધી જ સામગ્રીને મિક્સ કરો અને થોડા પાણી સાથે કઠણ કણક બાંધો.
- 5-7 મિનીટ સુધી બરાબર ગૂંથો.
- કણકમાંથી 12 એકસમાન લુઆ વાળો અને તેને કોટનના કપડામાં વિંટાળીને રાખી દો.
રીત: પૂરણ
- એક પેનમાં તેલ ગરમ કરો. તેમાં જીરુ અને હીંગ ઉમેરો.
- ત્યારબાદ તેમાં મગની દાળ નાંખીને થોડી ક્ષણ માટે હલાવીને પાકવા દો.
- તેમાં લીલા મરચાંની પેસ્ટ, આદુની પેસ્ટ, ગરમ મસાલો, બેસન, લાલ મરચાંનો પાવડર, આમચુર અને મીઠું ઉમેરો.
- બધી સામગ્રીને મિક્સ કરો અને 5-7 મિનીટ સુધી સતત હલાવતા રહો.
- આ મિશ્રણને 12 સરખા ભાગમાં વહેંચી દો અને બાજુમાં રાખી દો.
રીત: કચોરી
- દરેક લુઆને હાથથી દબાવીને 2 ઈંચની નાની રોટલી જેવુ બનાવો.
- પૂરણના 12 ભાગમાંથી 1 ભાગને તેમાં વચ્ચોવચ્ચ મૂકો.
- પૂરણને પેક કરવા માટે રોટલીના બધા છેડા ભેગા કરીને વચ્ચેના ભાગમાં દબાવી દો.
- આ છેડાને બરાબર બંધ કરો જેથી તળતી વખતે કચોરી ફૂટી ન જાય. વધારાનો કણક કાઢી શકો છો.
- હવે કચોરીને બન્ને હથેળી વચ્ચે રાખીને સહેજ દબાવી દો જેથી તેના આકારમાં આવી જાય.
- કચોરીના મધ્ય ભાગમાં અંગૂઠાની મદદથી સહેજ દબાવી દો.
- બાકીના કણક અને પૂરણમાંથી આવી જ રીતે કચોરી વાળી લો.
- તેલ ગરમ કરીને ગોલ્ડન બ્રાઉન થાય ત્યા સુધી તળી લો.
- કચોરીને સર્વ કરવા માટે એક પ્લેટમાં કચોરી લો અને તેની વચ્ચે કાણું પાડો.
- તેની અંદર ચટણી, દહીં અને જીરા પાવડર અને લીલા ધાણા ઉમેરીને સર્વ કરો.
Ingredients;
(makes
15 or more small cupcakes)
- 1 cup All purpose flour
- 1/2 cup sugar
- 1/4 cup oil
- 1/4 cup cocoa powder
- 1 tbsp. yogurt/curd
- 1/4 cup milk
- 2 tbsp. Nutella
- 2 tbsp. chocolate chips/sprinkles
- 1 tbsp. cherries in sugar syrup (optional)
- 2 tsp. coffee powder
- 1/2 tp. baking powder
- 1/4 tsp. baking soda
Method;
Sift the flour, baking powder, baking soda and cocoa powder twice. Beat sugar
and oil in a vessel till sugar is dissolved. Add yogurt and milk in it and beat
it again.
Add
the wet ingredients into the dry ingredients and fold it lightly to make smooth
batter.
Mix
Nutella, coffee powder and cherries in sugar syrup in a small vessel.
Preheat
oven at 190°C for 10 minutes.
Arrange
cupcake liners in a muffin tray.
Pour
a little batter in the liner, just to coat the base of it. Add a tsp of Nutella
mix, a few chocolate chips on the batter and cover it with some more batter. Do
the same for all the cupcakes.
Bake
the cupcakes at 190°C for 9-10 minutes or till done. Take the tray out and let
it cool.
Dust
the Nutella
& Coffee molten lava cupcakes with powder sugar and serve. these goodies
will have a gooey center but firm base and top.
Notes;
- I added a little mixed fruit preserve instead of cherries with syrup.
- Replace APF with wholewheat flour for healthier option.
- Coffee in the filling makes it slightly bitter, avoid it if you are making the cupcakes for children.
- These cupcakes also need to be slightly under-baked to get that gooey center.
2.
Chocolate Molten Lava Cake

rise-rise..baby..Oozing chocolate..
Ingredients;
(Adapted
from here)
- 1/2 cup Chocolate
- 1/2 cup butter
- 1/2 cup All purpose flour
- 1/3 cup sugar
- 2 tbsp. yogurt/curd
- 1 tsp. coffee powder (optional)
- 1/2 tsp. baking powder
Method; Melt chocolate and butter in a double boiler
(keep the vessel of chocolate & butter over another vessel filled with hot
water). Beat sugar and yogurt till sugar is dissolved and it forms a ribbon like
pattern when dropped.
Add
baking powder & coffee powder to the flour and mix well.

Sunken beauty..
Preheat
the oven at 190°C for 10 minutes.
Pour
both the wet ingredients of sugar and chocolate mix in the dry ingredients and
fold it lightly.
Grease
small Ramekins with butter and pour little batter in each.
Bake
the cake at 190°C for 6-7 minutes till the sides are firm but the center look
slightly wobbly. Take out of the oven and serve. You can invert the chocolate
molten cakes on serving dish, dust with powder sugar and pour chocolate sauce
for a royal treat.
Notes;
- I increased the flour a little in the recipe.
- Increase the yogurt quantity by 1 tbsp. if you like gooey and runny center.
- The molten cake will rise first while baking and will sunk as soon as you take it out of the oven, since it has more liquid content.

Moments of delight, serve the cake with more chocolate
sauce!
And
yes, I did not forget our Banana love Nelly, am bringing a Banana Cake as well
for your shower. Wish we could share our dishes with you in person. Congrats to
both of you, enjoy the moments and treasure the memories for life. Sending you
love & happiness from my family to yours.
Special
thanks to Heather for the logo, Elizabeth for the intro write up and to Junia for the spreadsheet. Don’t forget to
check out what the other wonderful food bloggers brought with them in this
virtual wedding shower party. Thanks everyone for making this online event
happen, love you all!
Molten Chocolate Lava Cake
Fills 4 medium-sized ramekins
Recipe source - showmethecurry.com
Ingredients:
Semi-Sweet Baking Chocolate – 4 oz (113g)
Butter – 1/2 cup + to grease ramekins
Eggs – 2
Sugar – 1/3 cup (75 g)
All-purpose Flour – 1/4 cup (40g)
How I Made It:
1. In a double boiler, melt chocolate. Once melted and shiny, remove pan from heat and add in butter. Mix until the butter melts fully. Set aside to cool.
2. In a medium mixing bowl, beat the eggs and sugar until light and fluffy (about 3 mins by electric mixer, 5 mins by hand)
3. Add chocolate-butter mixture into the eggs, add all-purpose flour and mix until well incorporated.
4. Butter bottom and sides of ramekins (small glass/porcelain bowls) and pour in mixture until 3/4 way full.
5. Bake in a pre-heated oven at 350 degrees Fahrenheit (180 C) for 10 – 15 minutes. Shorter for gooey (molten) inside, longer for stiff inside. I baked for about 13-15 mins.
6. Serve warm with ice-cream, fruits or whipped cream.
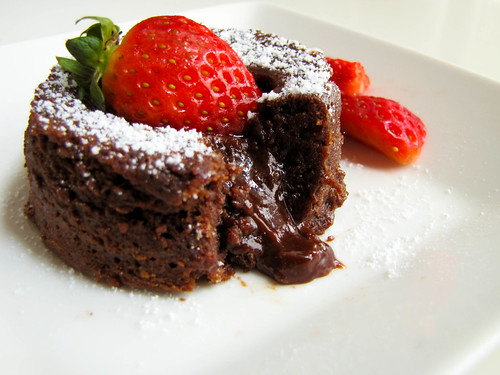
Yep, I had to push out some of the centre with my spoon to demo that ;) Now, one thing to remember is, you have to serve this with some fruits, whipped cream, or ice cream to balance out the dense chocolate flavour - its really overpowering. True death by chocolate!
http://www.youtube.com/watch?feature=endscreen&NR=1&v=H4nCR_MV-gY
 Bittergourd Thokku
Believe it or not, I love bittergourd because it is bitter and presents quite a challenge to make a palatable dish. What makes the vegetable exciting is that the dishes usually need sweet, sour and heat in them so you mask the bitterness to a large degree. Some say very dark green bittergourd are too bitter and best avoided. It is a shame that such a medicinally rich vegetable is not even known in this part of the world. The juice of this vegetable is extremely good to keep blood sugar controlled. I wanted to do something different with this vegetable this time and thought making it like a pickle, i could mix it with rice or eat it with curd rice. I had some spice powder left from making the ennai kathrikai kuzhambu so I have used that in this recipe. Click here to see the ingredients for the spice powder. I quite liked the outcome so here it is for you...
2 bittergourd, seeded, halved and cut
1 teaspoon mustard seeds
Asafoetida
1 teaspoon tamarind paste
Turmeric powder
Salt to taste
1 teaspoon spice powder
½ teaspoon chilly powder
1 tablespoon jaggery
Heat a kadai and add the bittergourd, tamarind paste and enough water to immerse the bittergourd and boil until bittergourd is just done. Drain the liquid and take a ladle and keep poking into the bittergourd so it gets cut into smaller pieces

Heat some oil in the kadai and add mustard seeds. Once it crackles, add turmeric powder, asafoetida and the bittergourd

Add salt, chilly powder, jaggery and mix well.

After all of them come together, add the spice powder and cook for couple of minutes

Serve

 Stuffed Ridgegourd
Of the many hard to come by vegetables in the region I live in, ridgegourd is one. I have written about this wonderful vegetable in a previous post. One day when I was pretty aimlessly browsing the internet I came across many stuffed ridgegourd recipes and then I thought I should make some myself. During my recent visit to England I managed to get hold of some of these goodies and first thing I tried after returning home was stuffed ridgegourd. My husband is usually not very fond of such stuffed vegetables so it was pretty much me that I was cooking for. I used 2 ridgegourds while the filling could yield 3-4 large ridgegourds. I was left with extra filling which I later used with chayote squash. I had no problem finishing off all that I made as it was really tasty.
2 tablespoons peanuts, roasted
1 tablespoon sesame seeds
1 onion, chopped
3 dry red chillies
Piece of ginger
1 tablespoon coriander seeds
Few curry leaves
Salt to taste
Turmeric powder
1 teaspoon mustard seeds
Asafoetida
3-4 ridgegourds
Cooking oil
Heat some oil in a pan and fry the onions for couple of minutes

Add the coriander seeds and red chillies and fry for couple of minutes

Add the ginger and sesame seeds and fry until aromatic

Keep aside and grind to paste along with curry leaves, salt, turmeric powder and peanuts


Peel the ridgegourd and cut into about 1.5 inch long pieces. Try to scoop some of the seeds out using a bread knife so you make some room for the stuffing


Fill the ridgegourds with the stuffing. You can smear the left over filling on the vegetable

Heat some oil and add mustard seeds and once they crackle, add turmeric powder and asafoetida. Add the stuffed veggies and sprinkle some salt, cook covered until done (about 20-25 minutes)

 Serve with rice or chapatti

 Arbi/Seppankezhangu Podimas (Taro Root/Colocasia with spicy powder)
There are some vegetables that are called ‘naatu kai’ and that simply means it belongs to that particular place. Back home such vegetables include snake gourd, chayote squash ash gourd, arbi etc. Beans, potatoes, carrots etc. are considered ‘english’ vegetables. When I was in India, I had taken the native vegetables for granted but once I moved to Scotland, I was quite shocked to barely find any of the wonderful vegetables I was used to. So every visit to an Indian grocery shop (which was once in a quarter), I will try to get as many vegetables as possible. That week would be exciting because I will recreate many yummy dishes that my mom and grandmothers used to do prepare and enjoy them. On a recent visit to my brother’s place, I got to make this arbi podimas and again because I seldom get arbi around where I live, it was a treat and did not miss my opportunity to photograph the steps. Here is the recipe...
20-25 numbers of small arbi
Cooking oil
1 teaspoon tamarind puree diluted in 2-3 tablespoons of water
Turmeric powder
Salt to taste
Curry leaves
Couple of pinches of dessicated coconut/freshly grated coconut
1 teaspoon mustard seeds
Asafoetida
For powder:
3 tablespoons channa dal
2 tablespoon coriander seeds (dhania)
4 dry red chillies
Cooking oil
Wash arbi well as it could be covered with mud. Steam them until a knife would comfortably slide in

Allow to cool so it is easy to handle, then peel the skin

In the meantime heat little oil in a kadai and roast the channa dal until golden brown then coriander seeds until aromatic and dry red chillies until they begin to change colour. Keep aside to cool and powder


Once powder is ready and arbi is peeled, heat oil in a kadai and add mustard seeds. After it splutters add asafoetida and turmeric powder

Add the arbi, if some of them are big, cut it else I would put them straight in as they are likely to get mashed when we stir. I cooled the arbi well so they retain their shape and do not get mushy. Add the curry leaves as well

Mix carefully so all the arbi are coated with the oil, mustard seeds and turmeric. Then add the tamarind water and again stir carefully

Fry for 8-10 minutes and then add salt and the ground powder and mix well. Roast for 10 minutes adding little more oil if needed

Serve!

 Arisi Upma
While growing up, rice upma was one of the dishes mom used to make often because all of us at home liked it. Infact I used to love the bits that were a bit overcooked and came out crisp at the bottom of the dish. Speaking of the dish, it is normally made in a traditional utensil called ‘vengala paanai’ which is a heavy metallic pot. The heaviness of the pot allows slow cooking without burning the food. My mom had bought one for me in my ancestral town of Kumbakonam as usually people there expect very high quality when it comes to utensils and end up being demanding customers. Anyway, she had sent it to me sometime back and I finally got to use it now as an uncle of mine asked me for arisi upma recipe. My husband does not like this dish at all so, honestly I have never made it before; my sister-in-law makes it often though. I got the recipe from my mom and almost followed it just until I wanted to add my twist. I substituted part of the raw rice with raw brown rice. As this recipe involves grinding the rice coarsely, one cannot find the brown rice without being told. So there you go, some wholegrain added to otherwise traditional recipe. A little technique that gets used while cooking this dish is covering it with a small cup half filled with water. This is said to prevent the upma from going dry and also, if you think you need more water, you could just add it from this cup as it would be warm. Some people like the upma grainy (grains standing out), some like it bit more mushy. The below recipe is for the latter so do reduce water quantity if you like it grainy. My mom used to make something called ‘pachai puli’ to go with this; I did not as it needed aubergine which does not arrive until middle of the week. So, finally, here is the recipe...
1 ½ cups rice (I used ½ cup brown rice and rest regular raw rice)
1 heaped tablespoon toor dal
1 teaspoon cumin seeds
½ teaspoon black peppercorns
2 dry red chillies
Few curry leaves
1 teaspoon mustard seeds
1 teaspoon urd dal
2 teaspoons channa dal
Asafoetida
Salt to taste
Cooking oil
Grind together rice, toor dal, cumin seeds and black pepper to a powder that is not fine but not too coarse


Heat some oil in a heavy bottomed dish or vengala paanai and add mustard seeds. Once it begins to crackle, add the dry red chillies, urd dal, channa dal, curry leaves and asafoetida. Allow the dals to start browning

Add about 3 glasses of water and required salt and bring to boil

Add the ground rice mixture and stir quickly so lumps do not form. Cover and cook on slow flame stirring occasionally. Cook for about 20-30 minutes, you can check if it is done by tasting the rice; if it still has a bite, give it more time. Depending on the desired consistency, you may want to add little more water in the middle of the process, make sure you add boiling water


 Serve hot with a tangy chutney or kuzhambu

Molten Chocolate Lava Cake
Fills 4 medium-sized ramekins
Recipe source - showmethecurry.com
Ingredients:
Semi-Sweet Baking Chocolate – 4 oz (113g)
Butter – 1/2 cup + to grease ramekins
Eggs – 2
Sugar – 1/3 cup (75 g)
All-purpose Flour – 1/4 cup (40g)
How I Made It:
1. In a double boiler, melt chocolate. Once melted and shiny, remove pan from heat and add in butter. Mix until the butter melts fully. Set aside to cool.
2. In a medium mixing bowl, beat the eggs and sugar until light and fluffy (about 3 mins by electric mixer, 5 mins by hand)
3. Add chocolate-butter mixture into the eggs, add all-purpose flour and mix until well incorporated.
4. Butter bottom and sides of ramekins (small glass/porcelain bowls) and pour in mixture until 3/4 way full.
5. Bake in a pre-heated oven at 350 degrees Fahrenheit (180 C) for 10 – 15 minutes. Shorter for gooey (molten) inside, longer for stiff inside. I baked for about 13-15 mins.
6. Serve warm with ice-cream, fruits or whipped cream.
Yep, I had to push out some of the centre with my spoon to demo that ;) Now, one thing to remember is, you have to serve this with some fruits, whipped cream, or ice cream to balance out the dense chocolate flavour - its really overpowering. True death by chocolate!
http://www.youtube.com/watch?feature=endscreen&NR=1&v=H4nCR_MV-gY
*****************
Pavakkai Thokku (Bittergourd Thokku)

Believe it or not, I love bittergourd because it is bitter and presents quite a challenge to make a palatable dish. What makes the vegetable exciting is that the dishes usually need sweet, sour and heat in them so you mask the bitterness to a large degree. Some say very dark green bittergourd are too bitter and best avoided. It is a shame that such a medicinally rich vegetable is not even known in this part of the world. The juice of this vegetable is extremely good to keep blood sugar controlled. I wanted to do something different with this vegetable this time and thought making it like a pickle, i could mix it with rice or eat it with curd rice. I had some spice powder left from making the ennai kathrikai kuzhambu so I have used that in this recipe. Click here to see the ingredients for the spice powder. I quite liked the outcome so here it is for you...
2 bittergourd, seeded, halved and cut
1 teaspoon mustard seeds
Asafoetida
1 teaspoon tamarind paste
Turmeric powder
Salt to taste
1 teaspoon spice powder
½ teaspoon chilly powder
1 tablespoon jaggery
Heat a kadai and add the bittergourd, tamarind paste and enough water to immerse the bittergourd and boil until bittergourd is just done. Drain the liquid and take a ladle and keep poking into the bittergourd so it gets cut into smaller pieces

Heat some oil in the kadai and add mustard seeds. Once it crackles, add turmeric powder, asafoetida and the bittergourd

Add salt, chilly powder, jaggery and mix well.

After all of them come together, add the spice powder and cook for couple of minutes

Serve

Stuffed Ridgegourd

Of the many hard to come by vegetables in the region I live in, ridgegourd is one. I have written about this wonderful vegetable in a previous post. One day when I was pretty aimlessly browsing the internet I came across many stuffed ridgegourd recipes and then I thought I should make some myself. During my recent visit to England I managed to get hold of some of these goodies and first thing I tried after returning home was stuffed ridgegourd. My husband is usually not very fond of such stuffed vegetables so it was pretty much me that I was cooking for. I used 2 ridgegourds while the filling could yield 3-4 large ridgegourds. I was left with extra filling which I later used with chayote squash. I had no problem finishing off all that I made as it was really tasty.
2 tablespoons peanuts, roasted
1 tablespoon sesame seeds
1 onion, chopped
3 dry red chillies
Piece of ginger
1 tablespoon coriander seeds
Few curry leaves
Salt to taste
Turmeric powder
1 teaspoon mustard seeds
Asafoetida
3-4 ridgegourds
Cooking oil
Heat some oil in a pan and fry the onions for couple of minutes

Add the coriander seeds and red chillies and fry for couple of minutes

Add the ginger and sesame seeds and fry until aromatic

Keep aside and grind to paste along with curry leaves, salt, turmeric powder and peanuts


Peel the ridgegourd and cut into about 1.5 inch long pieces. Try to scoop some of the seeds out using a bread knife so you make some room for the stuffing


Fill the ridgegourds with the stuffing. You can smear the left over filling on the vegetable

Heat some oil and add mustard seeds and once they crackle, add turmeric powder and asafoetida. Add the stuffed veggies and sprinkle some salt, cook covered until done (about 20-25 minutes)


Arbi/Seppankezhangu Podimas (Taro Root/Colocasia with spicy powder)

There are some vegetables that are called ‘naatu kai’ and that simply means it belongs to that particular place. Back home such vegetables include snake gourd, chayote squash ash gourd, arbi etc. Beans, potatoes, carrots etc. are considered ‘english’ vegetables. When I was in India, I had taken the native vegetables for granted but once I moved to Scotland, I was quite shocked to barely find any of the wonderful vegetables I was used to. So every visit to an Indian grocery shop (which was once in a quarter), I will try to get as many vegetables as possible. That week would be exciting because I will recreate many yummy dishes that my mom and grandmothers used to do prepare and enjoy them. On a recent visit to my brother’s place, I got to make this arbi podimas and again because I seldom get arbi around where I live, it was a treat and did not miss my opportunity to photograph the steps. Here is the recipe...
20-25 numbers of small arbi
Cooking oil
1 teaspoon tamarind puree diluted in 2-3 tablespoons of water
Turmeric powder
Salt to taste
Curry leaves
Couple of pinches of dessicated coconut/freshly grated coconut
1 teaspoon mustard seeds
Asafoetida
For powder:
3 tablespoons channa dal
2 tablespoon coriander seeds (dhania)
4 dry red chillies
Cooking oil
Wash arbi well as it could be covered with mud. Steam them until a knife would comfortably slide in

Allow to cool so it is easy to handle, then peel the skin

In the meantime heat little oil in a kadai and roast the channa dal until golden brown then coriander seeds until aromatic and dry red chillies until they begin to change colour. Keep aside to cool and powder


Once powder is ready and arbi is peeled, heat oil in a kadai and add mustard seeds. After it splutters add asafoetida and turmeric powder

Add the arbi, if some of them are big, cut it else I would put them straight in as they are likely to get mashed when we stir. I cooled the arbi well so they retain their shape and do not get mushy. Add the curry leaves as well

Mix carefully so all the arbi are coated with the oil, mustard seeds and turmeric. Then add the tamarind water and again stir carefully

Fry for 8-10 minutes and then add salt and the ground powder and mix well. Roast for 10 minutes adding little more oil if needed

Serve!

Arisi Upma

While growing up, rice upma was one of the dishes mom used to make often because all of us at home liked it. Infact I used to love the bits that were a bit overcooked and came out crisp at the bottom of the dish. Speaking of the dish, it is normally made in a traditional utensil called ‘vengala paanai’ which is a heavy metallic pot. The heaviness of the pot allows slow cooking without burning the food. My mom had bought one for me in my ancestral town of Kumbakonam as usually people there expect very high quality when it comes to utensils and end up being demanding customers. Anyway, she had sent it to me sometime back and I finally got to use it now as an uncle of mine asked me for arisi upma recipe. My husband does not like this dish at all so, honestly I have never made it before; my sister-in-law makes it often though. I got the recipe from my mom and almost followed it just until I wanted to add my twist. I substituted part of the raw rice with raw brown rice. As this recipe involves grinding the rice coarsely, one cannot find the brown rice without being told. So there you go, some wholegrain added to otherwise traditional recipe. A little technique that gets used while cooking this dish is covering it with a small cup half filled with water. This is said to prevent the upma from going dry and also, if you think you need more water, you could just add it from this cup as it would be warm. Some people like the upma grainy (grains standing out), some like it bit more mushy. The below recipe is for the latter so do reduce water quantity if you like it grainy. My mom used to make something called ‘pachai puli’ to go with this; I did not as it needed aubergine which does not arrive until middle of the week. So, finally, here is the recipe...
1 ½ cups rice (I used ½ cup brown rice and rest regular raw rice)
1 heaped tablespoon toor dal
1 teaspoon cumin seeds
½ teaspoon black peppercorns
2 dry red chillies
Few curry leaves
1 teaspoon mustard seeds
1 teaspoon urd dal
2 teaspoons channa dal
Asafoetida
Salt to taste
Cooking oil
Grind together rice, toor dal, cumin seeds and black pepper to a powder that is not fine but not too coarse


Heat some oil in a heavy bottomed dish or vengala paanai and add mustard seeds. Once it begins to crackle, add the dry red chillies, urd dal, channa dal, curry leaves and asafoetida. Allow the dals to start browning

Add about 3 glasses of water and required salt and bring to boil

Add the ground rice mixture and stir quickly so lumps do not form. Cover and cook on slow flame stirring occasionally. Cook for about 20-30 minutes, you can check if it is done by tasting the rice; if it still has a bite, give it more time. Depending on the desired consistency, you may want to add little more water in the middle of the process, make sure you add boiling water


